


Bottom Bracket Selection Guide

Threaded external cup style bottom brackets are only easy to install if you do it correctly. In this video we show you the proper techniques needed to get the job done right. Here's that link How To Set Up Shimano Cranks Right: Some handy links: Park Tool bottom bracket tool:
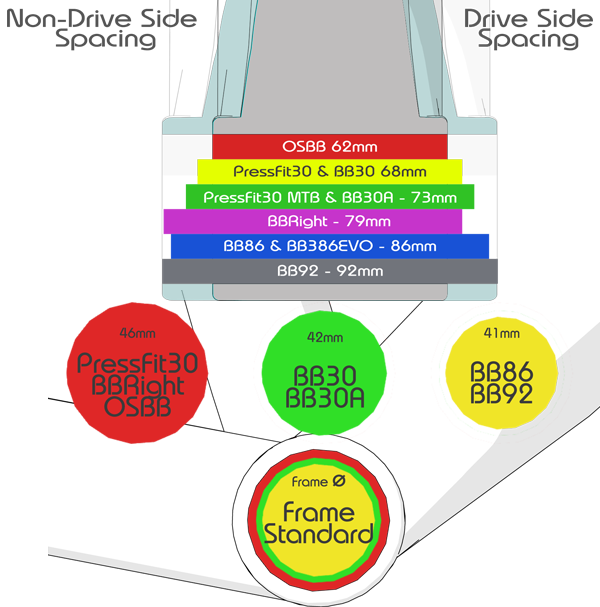
Now I am going to install this threaded bottom bracket with just a little bit of grease. I already went over in the last video the different things that can be used and that are no problem whatsoever. So, remember what we said before that. In order to install the bottom bracket correctly we need to come up over the top toward the rear wheel so we're turning it in the direction of the rear wheel uh to tighten it and I'm just going to screw this one in here right away now some people are going to ask about chasing and facing chasing. Yes, facing generally not needed unless the frame is brand new. It is not something you're going to want to do every time because when you face it, you're taking material off the face of the bottom bracket shell. And if you're taking material off the face of the bottom bracket shell repeatedly eventually it's not going to be 73mm anymore. If it's a mountain bike or you know what I mean, we're going to reduce the amount of meat we have and we don't want to do that. And you see how easy this is screwing in here right now, I don't need to use the tool to screw this in. This is absolutely extremely important that it has to be free spinning when you're putting it in the frame initially if you're trying to screw it in you can't screw it in by hand and you absolutely have to put a tool in it and it's only about halfway in. Stop, your frame needs to be chased properly. It has to be because you start doing it it's going to strip threads. If it's an aluminum frame or aluminum inserts like this, it will just absolutely wreak havoc. Do not do that. So you should have a nice easy pressure on it just like that we're going to snug it down just like that and we're going to torque it in a second and there we go we can just go ahead and snug it down just like that we're going to come in on top with the torque wrench to 30 to 35 to 40 Nm. But right now, I want to talk about spacers alright. There are so many setups and so many applications nowadays with different setup. Different spacers for this and that and all this kind of stuff really you need to consult the manufacturer's guidelines, the crank manufacturer's guidelines on what kind of spacer setup to use because there are just so many different setups it would be hard for me to tell you something now that's fast and loose. Those days are long gone. Refer to those materials. So let's torque this thing. Right now I have set my torque wrench to 40 Nm and remember, we're turning this one to the left because it is left hand thread. There are a couple ways to go about this. I like to actually brace my arm across the bike like this and I like to get a good solid torque on it like that see the reason I'm doing that is because if you're up here doing this you're getting deflection okay you're getting deflection that is going to throw off the torque value okay any movement here that's extra is throwing off the torque value so I like to brace it like that there'll be other ways to do it but when you're working in a stand this just makes it easy to do and like I said I'm showing you guys step by step here because I don't want to misrepresent any of this it's important to get it correct. We'll talk about torque wrenches in another video but you need to send them off and have them calibrated on occasion and use a good quality one this happens to be Snap-On doesn't have to be that fancy park tool makes a good one as well all right so get asked about this a lot can I use grease on there. Use grease to your heart's content my friend you can grease it up all you like. I like to do it kind of makes everything kind of gel get together you know be real smooth and in just a second here we are going to install the crank you've seen us do that a lot in separate videos especially for Shimano extremely popular crank set a few pitfalls we have videos on those highly recommend them to you to check those out so let's install the crank right now okay so the crankset is now properly pre-loaded you guys who have seen our videos before I was using my finger method you guys will we'll put a link to that in the description and here's the payoff and now these are gonna sweeten up a little bit as you ride it more and more but this is the kind of spin you should get when you're all done.
Comments will be approved before showing up.