


Bottom Bracket Selection Guide

The all-new Cervelo Soloist boasts a T47 version of BBRight, which was first introduced by Factor in the Ostro Vam under the BBCorrect name. To clarify: BBRight T47 is the same as T47A and BBCorrect. Our One-Piece, hub-style bottom bracket threads into the asymmetrical Cervelo frame easily, boosting stiffness while aligning the bearings for that incredible BBInfinite spin you've come to expect. And of course, the system is dead quiet. BBInfinite is here to solve the bottom bracket creaking and squeaking that's ruining you ride. BBInfinite doesn't just fix a bottom bracket creak, we deliver the highest spin performance of any bottom bracket system out there. Faster and creak-free? Absolutely, with BBInfinite.
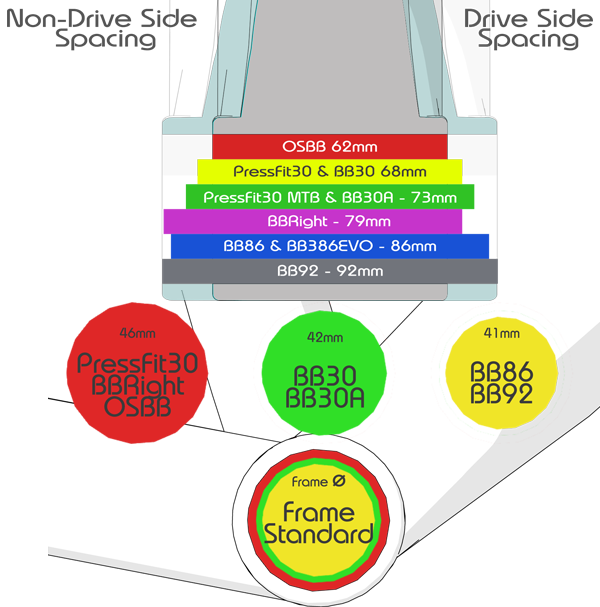
This is the new T47 One-Piece bottom bracket for this Cervelo Soloist, which just came out. Now this is a factory bottom bracket and we're going to see that's about how good it's going to perform- Now, it's got multi-pieces. See it's something like this and whereas our bottom bracket is all one piece, has perfect bearing alignment just like the front wheel hub. So let's see if we can improve on that before we do the install. I want to get into some details about T47A, which is also known as BBRright. T47, which is also known as BBCorrect. Don't be too confused because Factor kind of introduced this a while ago and that make that they called it BBCorrect, but it is basically a 77mm asymmetric T47 bottom bracket. confused yet? I'll explain it don't worry. But the first thing that you want to see is how much does this weigh. All right, so we'll go ahead and turn that on that'd help um it's sitting right at 99g that's as it would be installed in the bike now here is the factory one that I just removed this is the factory Cervelo one and you'll notice it maxes out the scale because this one only goes to 100g I can tell you this is 162g as it's in a bike so our T47 one piece even though it is one piece unlike this Factory one which is multi-piece it is still considerably lighter now T47a the a stands for asymmetry or asymmetrical now anybody who knows about BBRight okay A little brain teaser there here's BBRight as a PressFit and here's BBRight as a threaded you see that now if this was inside the bike as a press fit this would be all hidden because it's inside the bike and this nose would be sticking out the reason for that is that the bottom bracket shell itself on the bike if you'll come around here and take a quick look the bottom bracket shell itself is actually offset to the drives to the non-drive side because you can actually see this right here see how this arm this non-drive side chainstay is so much thinner I mean thicker than this thinner Drive side one. That's because the offset needs to be over here all right and you can see those nice threads inside of there but because crankshafts cranks like this Shimano one are not asymmetrical they need to be in the bike symmetrically on the center line uh we need to have that that offset needs to be built into it I know that really messes with people another thing that kind of messes with the mind a little bit is because this is a one piece bottom bracket when it is it's also a the same exact unit that would fit in a track or any 86.5 T47, otherwise known as T47 internal. Alright- and that means in that configuration this ring would basically be on there just like this okay because that the full width of that bike is 86 now because this Cervelo is going to be more like right in that 77mm range. When it's in the bike it will actually look like that so that this screws through like that. You'll see this little turtle head poke out right there until it's sticking out on the drive side to form that offset that's necessary so let's go ahead and put this in now that we've cleared up some of the misunderstandings. So to begin the installation, we're going to do something invite mechanics love to do we're going to grease this up oh grease it's the best but it just needs simple grease. I mean some people might want to put something like Teflon tape on the bottom bracket itself, and I mean you can do that if you want but that's really not required. Any kind of retaining compound is not required just Grease and and then this little ring right here of course. In case you guys didn't know the uh this goes on the drive side okay and uh this Delrin ring right here is just gonna be uh put in here to uh basically like a hand torque okay and this uh polymer uh socket comes with the t47 bottom bracket uh any of the t47 bottom brackets that you get from us this just slips over that ring and like I said we're just going to tighten it all the way because remember this is left hand thread on one side right hand thread on the other because it's in that old kind of BSA English threaded format even though it's a king size as in Chris king size because Chris King is the one that has invented t47 it was his brainchild and we are big fans of Chris King yeah technically he's competition but I admire Chris King greatly he's uh he's a great American and an absolutely phenomenal Machinist I digress now we want to put a little bit of Grease on the inside of the Ring here okay nice and neat try to be nice and neat with the grease okay and then when we're going to install this side easy enough we're going to go ahead and install it of course install from non-drive side install this direction keeps it simple and we're gonna have to give it a little a little push to get the nose started and then right there now it's ready to engage some threads you can use uh this is a our BB infinite 16 Notch tool okay this works on all of our all of our BSA threaded stuff no matter what in all of our Italian it also works on our our t47 external bottom brackets um and uh and it works on this tool right here gives us a nice interface there so we can get on the Tool uh with a ratchet this is just a your typical same exact uh format as a park tools BBT 69.2 so you don't have to use our tool um this meaning that but this you most certainly do and we'll go ahead and uh we'll go ahead and tighten that bad boy up here and normally I don't just show what it looks like when you're tightening something but we want to keep our eyes over here because we're going to start to see something happen look at that okay we really want to see what's going on here because what's happening is that is poking out of this side as you can see to form that offset that is necessary for the BB Wright t47 system also known as t-47 asymmetrical for t47a don't you like the way the bike industry likes to call everything by about six different names anyway that's why we're here to help you out I have set the torque wrench to 22 foot-pounds okay because this does not read in newton meters this is 30 newton meters equivalent okay and we're just gonna just like that that's it it's done it broke away at 22 foot pounds which is 30 newton meters which is the torque spec for this bottom bracket you're done it's time to install the crank now all right putting a little bit of grease on the top hats which is what we call them inserts that go inside here and make these 25 millimeter internal diameter bearings into uh 24 millimeter with a nice tight fit and also this is a nice feature unlike this Factory one which has 24 millimeter bearings the uh not Irreplaceable shimanos metal steel spindle is going to be up against this steel bearing this is a major source of creaking I have no idea why people keep doing this there's a reason why Shimano does the top hat style like this which insulates the steel from the steel with the polymer like I said the reason Shimano does it is because they don't want it to Creak the reason we do it is because we don't want it to Creak if it's Steel on steel it's going to Creak and cause corrosion and it could cause wear and like I said you cannot replace a spindle on a Shimano crank once it's worn down much past 24 it's no good whenever you're changing between systems always look on the back sides of these spindles because you see how this is kind of stuck on here come here and look that if this is on here because the grease is kind of holding on that could actually look like it belongs there that's actually it doesn't want to come off that's actually the seal from the old system that's going to add two millimeters to your offset and you would be chasing your tail wondering why I can't adjust my front derailleur because the crank is now two millimeters or more further out than it's supposed to be so um make sure it's stripped down all the way before you go ahead and put it in the bike okay whenever I'm doing an assembly of anything I like to do like little intermediate checks so I just will go ahead and pop the crank arm on here and make sure that the plastic tab is popped down and just do a quick spin on it just to see how things are starting to look um looking good but yeah I mean if you're at this point you're just starting to put it together and something already isn't working right um stop it should be it should be spinning awesome because it has zero preload on it of any kind right now all right let me go ahead and uh I'm gonna torque these to uh the uh 14 newton meters I'll wait until my wrist Pops at uh 12 so I just go like a little bit uh Pat no I'm just kidding torque wrench time all right and then all right excellent let's do a real spin well that's what they call a job well done
Comments will be approved before showing up.