


Bottom Bracket Selection Guide

When you're preparing to install a bottom bracket and a crank set you need to take a breath, a step back, and consider every aspect of what you're about to undertake to ensure you're going to get the results you're expecting. In this video we show install a Race Face Next SL crank set with Absolute Black Oval ring. Get some!
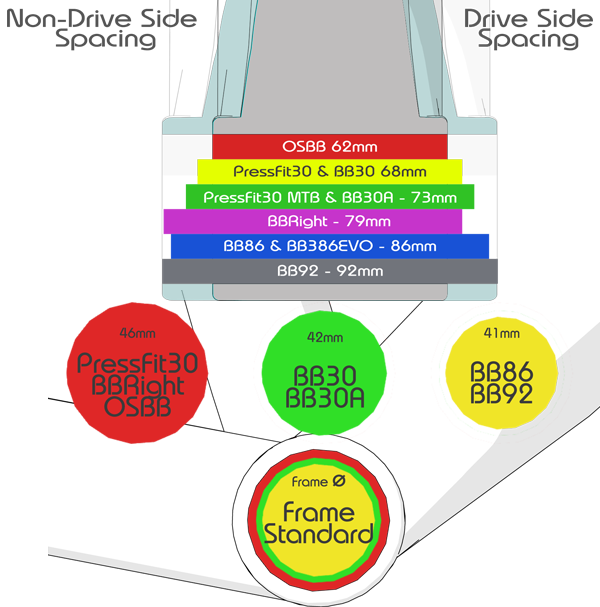
First thing we need to do is we need to look at this right here we need to see what the RF number this one happens to be RF136 if you go on the website for RaceFace they have codes that correspond to how long the spindle is and that'll let you know a lot of times how long how many spacers you need to put in here this one will take two 2.5mm spacers one on each side and that's because this is an XC crank but it has a little bit longer spindle than you would expect from a DUB crank or something like that so of course we're going to do spacer and then dust shield because the dust shield always needs to be up against the bearing and then we're going to go spacer -excuse me - dust shield and then spacer just like that and we want to put a little bit of grease on the end of the spindle right there and then a little bit where the bolt is going to go. Now I'm going to go ahead and tighten this up you'll notice there's no wave washer being used in the system. You do not use a wave washer in conjunction with anything that has one of these knobs on it that does the preloading. The wave washer is going to be used in a system that doesn't have something that already can do preload seeing as how this does you do not put a wave washer in any of these crank systems after you've torqued the crank arm you want to force the entire assembly over to the non-drive side where the adjuster is. Now a word about these adjusters most of them are plastic especially these RaceFace cranks and Easton cranks. They're plastic so they're not that strong they're strong enough to get the job done but if you're expecting to be able to really push on them hard and put a lot of pressure on them you can't now this is a really important here this little gap right here we want to go ahead and tighten this bolt this little screw actually until we can just move this ring because we want to use the screw to go ahead and hold this gap as tight as possible because if we leave the screw backed way out it'll it'll like it'll skip it'll it'll as you're tightening it it'll want to open and it's not going to give you an accurate feel and also with our bottom bracket we have the true drive sleeve between the bearings so you're going to want to tighten this as much as you possibly can and then lock it down and it'll be perfect you don't have to play that game of you know enough preload not enough preload bearings are spinning good not it doesn't that's not a problem for us so I just tightened it down right there you can see looks pretty good and then I'm going to go ahead and lock that down right there so that the gap is gone it's they're touching on both sides and that's all you need to do all right guys visit bbinfinite.com to get your mad spin
Comments will be approved before showing up.